Zones of Defense
(Pang Wi Chi Dae)
by
Grand Master James S. Benko, Ph.D.
Introduction
The concept of using defensive zones to enhance a student’s ability to grasp the theories of defensive action is not limited to any one particular martial art.
Indeed most fighting arts utilize the concept of the zones of defense. However, there may be a variety of different methods of teaching the implementation of these zones,
nevertheless, the results are strikingly similar. It is vital that you understand, in detail, about the zones of defense when learning ji pang e techniques.
The zones of defense are divided into three categories; height zones, width zones, and depth zones. These zones, are used when performing either defensive or offensive techniques.
In the case of an offensive technique, the reference is to the justified counterattack, not an unprovoked attack. A detailed study of these defensive zones should be made by all martial arts
students in order to more effectively comprehend the almost unlimited usefulness of techniques in relation to the zones of defense.
Height Zones
One of the first considerations when choosing a technique for defense is the height of the opponent. In many cases the technique used against an aggressor who is
much taller than you may not be appropriate against another opponent who may be a great deal shorter than you. As an example, if an opponent is either kneeling or in a
crouching position, his height has been dramatically altered, thus requiring you to vary your technique to fit the situation. For the purpose of developing an effective method
of self-defense, which takes into consideration the height of the opponent in relation to you and your position, the body is divided into three imaginary sections known as height zones.
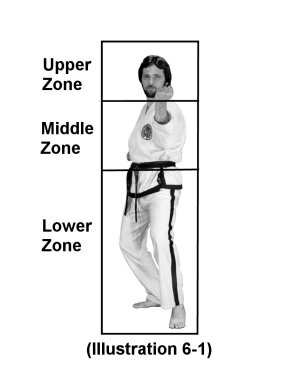
There are three height zones; the upper zone, middle zone and lower zone. Each of these zones encompasses not only the height of the opponent as he directly faces you, as in the case of a frontal position,
but the height of the aggressor as viewed from the sides and back as well. Height zones are not simply two dimensional, as in the height and width of the zones, but three dimensional, due to the
fact that the height zones also include the depth of each of these three zones, which completely encircle the opponent.
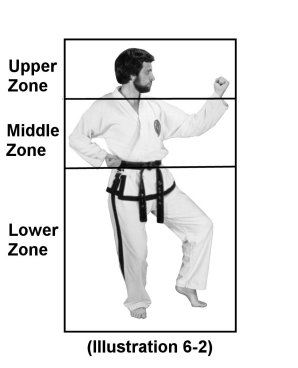
If you are standing face-to-face with an opponent, as in illustration 6-1, the height zones are still the same if you were to view an opponent from the side, as in illustration 6-2. As long as the opponent maintains the
same height, the dimensions of the zones will remain the same. If, however, the opponent should kneel down, the dimensions of the zones will alter to correspond to the height of the opponent.
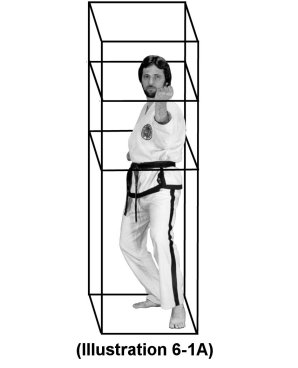
The height zones completely surround you as though you were standing inside a large transparent box which alters with your changing body positions and movements. A three-dimensional view of the height zones,
as seen from the front, are shown in illustration 6-1A
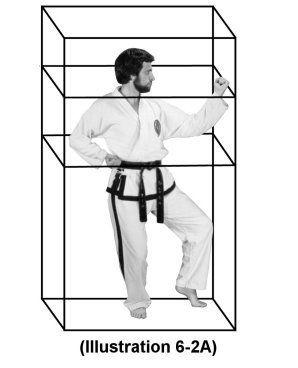
A three-dimensional view of the height zones, as seen from an opponent viewed from the side, is shown in illustration 6-2A. As you can see from these illustrations, the height zones are multi-dimensional in that
you are completely enclosed within the height zones.
Contained within the upper zone are the shoulders, neck and head. The middle zone includes the upper torso from just below the shoulders to the top of the hips. The lower zone encompasses the portion of
the body from the top of the hips downward.
Width Zones
In addition to the body being divided into height zones, the body is further divided by an imaginary line which runs down the center of the body, from the top of the head to the ground.
This imaginary line is called the “centerline”. The centerline divides the body into width zones. Though there is a broad range of width zones, only the two major zones concerning width will be examined here.
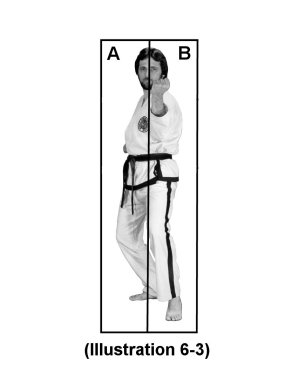
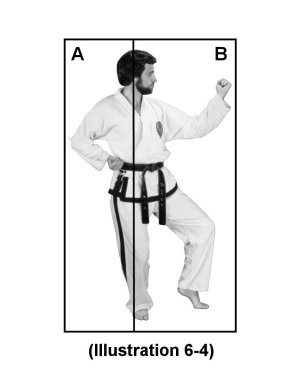
As you stand face-to-face with an opponent, illustration 6-3 shows how the centerline divides the body into two width zones. In illustration 6-4, you can see how the centerline, which travels from the top of the head to the
ground, has again divided the body into two width zones. However, there is one more major difference between these two illustrations.
The width of the zones in illustration 6-3 is not equal to the width of the zones in illustration 6-4. The width of the zone labeled “B” in illustration 6-4 has greatly increased because the lead hand and leg are extended.
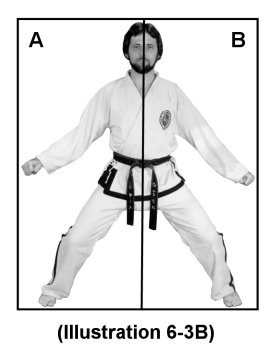
From the front view, illustration 6-3, the width zones are almost the same. If the opponent were to assume a sitting stance while extending his arms outward to his sides, as in illustration 6-3B,
the width zones would alter to conform to the opponent’s new position and related body dimensions.
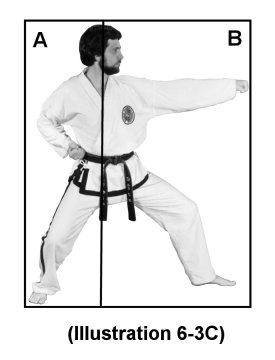
Another example of how width zones fluctuate is if the opponent were to assume a fixed stance while punching with his left hand, as in illustration 6-3C, the width zones would once more alter.
The widths of the zones would again change as the zone which contains the extended arm, labeled “B”, would increase, while the width of zone “A” remains relatively the same.
This is due to the fact that the extended left arm and leg alter the dimensions of the width zones in this particular situation.
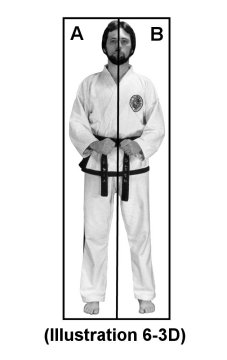
Still another example of how width zones change would be if the opponent were to assume a parallel stance, as in illustration 6-3D. The dimensions of the width zones would again change to become much narrower
than those of the sitting stance. also, the widths of the zones are now equal.
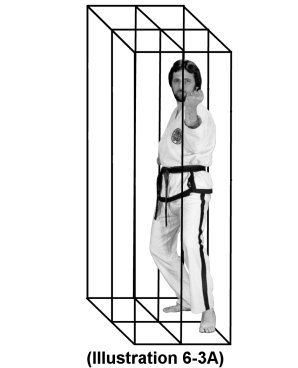
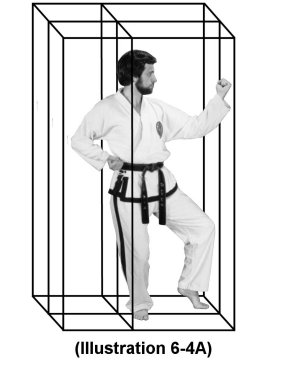
Width zones are also three-dimensional. Illustration 6-3A is an example of how the body is divided into four quadrants, as viewed from the front. A side view of the width zones, in a three-dimensional perspective, is
demonstrated in illustration 6-4A.
Depth Zones
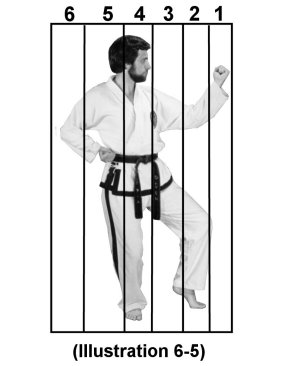
Depth zones are used to take into account variables relating to penetration in both offensive and defensive techniques. The number of zones, width of the zones, and the height of the depth zones are
almost constantly changing. In Illustration 6-5, you see six depth zones.
Zone 1 is from the front of the hand to the wrist. In this zone the subject may use his hand to block. This would be a defensive movement. On the other hand, the subject’s hand may be struck, perhaps
by a weapon, kick or hand strike. This example illustrates how an attack may be directed toward this depth zone. If an attack were to penetrate further into the depth zones it would enter zone 2.
Zone 2 consist of the area of the forearm from the wrist to the elbow.
Zone 3’s range is from the elbow to the lead shoulder.
Zone 4 is from the lead shoulder to the “centerline”.
Zone 5 encompasses the area from the centerline to the rear shoulder.
Zone 6 is, in this particular example, from the rear of the shoulder to the rest of the arm. Each of these depth zones contain several hyel do (vital points), which may be used as targets, plus parts of
the body which may be used to defend against an attack.
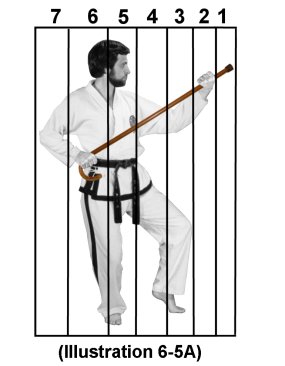
In illustration 6-5A, the subject is holding a ji pang e (cane). The length of the cane has extended the depth zones, adding a new zone which an opponent must penetrate in
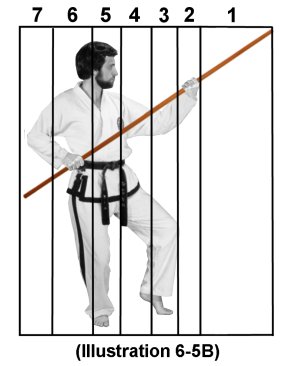
order to make contact with the other person. A longer weapon, such as the six-foot jang bong (long staff), would further extend the range of defense and add still another depth zone,
as in illustration 6-5B. If the subject were to put his hands by his sides and stand naturally, the dimensions of the depth zones would be altered, by becoming much narrower,
to conform to the subject’s new position.
Multi-Dimensional Zoning
It is the centerline which divides each defensive zone into left and right. By dividing the defensive zones into right and left, it becomes much easier to determine which portion of a zone is being infiltrated.
This information makes it simpler to decide on a course of defensive action, and if necessary, a counteraction.
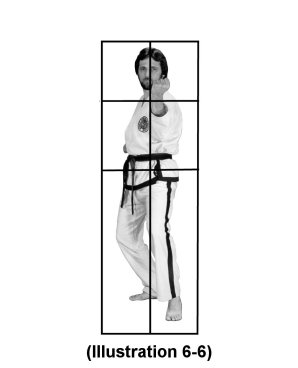
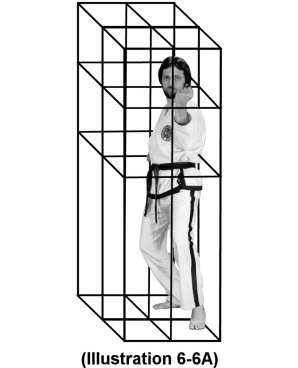
Illustration 6-6 is a two-dimensional front view of both the height zones and width zones. Illustration 6-6A is a three-dimensional perspective of the zones from the front.
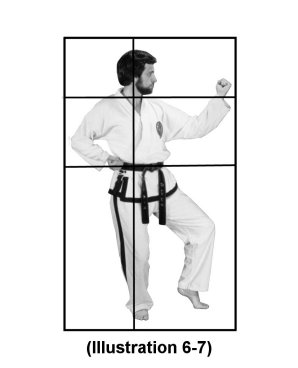
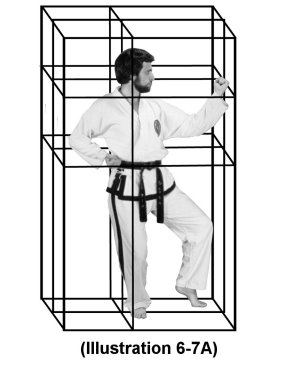
In illustration 6-7 you see a side view of the height zones and which zones on a two-dimensional level. Illustration 6-7A is a side view of the zones as seen from a three-dimensional perspective.
The Six Primary
Zones of Defense
|
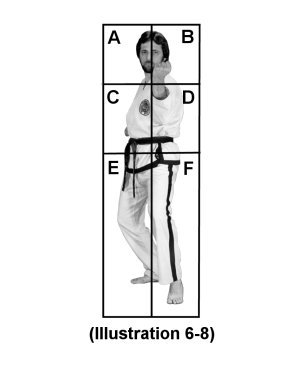
The union of the height zones and width zones results in the zones being divided into subsections (see illustration 6-8). There are six zone subsections; (A) Upper Right Zone. (B) Upper Left Zone.
(C) Middle Right Zone. (D) Middle Left Zone. (E) Lower Right Zone. (F) Lower Left Zone.
These subsections are used to aid you in determining the specific zone subsection toward which you will direct your defense and are known as the Six Primary Zones of Defense.
Defending The Zones
At a very low level, the student is taught in, some styles, to defend against a particular attack as opposed to defending certain areas of the body. Many martial arts styles don’t even teach about defending zones.
Higher evolved and more intricate martial arts systems incorporate concept of zone defense as pert of their regular training.
In order for you to be injured, a hostile force must penetrate one of the six primary zones of defense in order to reach its intended target.
The six primary zones of defense are the keys to developing both effective defenses as well as attacks. By learning the weak points of thee zones you will be
better able to logically and methodically create practical counterattack techniques.
It would be almost impossible to try and guess what specific target an opponent might try to strike; the side of your head, your stomach, your face, your groin, etc.
Even if you knew the type of attack and its intended target, you may not have, enough time to react and defend yourself.
Therefore, defenses are based on defending a “zone” as opposed to a specific target.
If an attack were to be directed toward your head, say your right temple, you would defend your upper zone area. To be specific, the upper right zone, for the attack will be entering this zone of defense.
You would concentrate on defending the zone area, not the specific target.
Defending The Upper Zone
The upper zone is defended by blocking or deflecting attacks to the right, left, straight upward or by blocking upward or downward at forty-five degree angles.
You would not block an attack directed toward the upper zone in a straight downward direction. This may force the attack to enter the middle zone, and may result in striking one of the vital targets in this zone.
Since the upper zone includes a great variety of vital point targets, it would be a prime level to focus attacks when you are counterattacking.
Direct your strikes to the primary targets which will bring down an opponent with a single strike. You may not get a second chance.
Defending The Middle Zone
The middle zone, protects the majority of your major internal organs. This zone is primarily defended by blocking across your body to the right or left, or by blocking upward or downward at forty-five degree angles.
Attempting to deflect an attack straight upward is also effective as long as you move your body at an angle which puts it out of the line of attack. If you attempt to block an attack directed toward the middle zone,
upward, without repositioning yourself may redirect the attack into the upper zone, and may cause damage in this area.
Blocking an attack straight downward, without simultaneously evading the attack, could divert the attack into the lower zone, and may result in damage to a vital target in this zone.
When defending against attacks directed at the middle zone, do not block upward or downward unless at forty-five angles.
Defending The Lower Zone
The lower zone is perhaps the hardest to defend. Though the arms and hands may be used in defending attacks to the upper zone and middle zones, only a small portion of the lower zone
can be protected using the arms and hands due to their limited reach. Footwork, body-shifting, weaving, and long-range techniques are primarily used to defend the lower zone.
Because this zone is so hard to protect it is excellent for catching an opponent off guard if you are careful and are able to time your attack. By alternating attacks, high then low,
in rapid succession, you may be able to penetrate an opponent’s defenses.
This article and illustrations are from Grand Master Benko's book:
"Korean Cane Techniques (Ji Pang E Sul)"
|